Assalamu'alaikum kawan..!!
Sedikit penjelasan cisco
paket tracer (CPT) merupakan tool untuk mendisign jaringan secara virtual di pc
atau laptop kalian..
langsung saja
tahapan-tahapanya kya gini bro :.
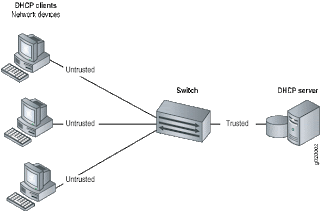
1. buatlah skema jaringan
seperti berikut :.

Keterangan gambar :
1. Router :
1 Router 2621XM
2. Switch
1 Switch 2960-24 TT
3. Pc
3 generic-PC
4. Kabel
Straight
1 Router 2621XM
2. Switch
1 Switch 2960-24 TT
3. Pc
3 generic-PC
4. Kabel
Straight
2. Konfigurasikan Routernya
seperti berikut :
Router>enable
Router#conf t
Enter configuration commands, one per line. End with CNTL/Z.
Router(config)#hostname DHCP-SERVER
Router#conf t
Enter configuration commands, one per line. End with CNTL/Z.
Router(config)#hostname DHCP-SERVER
Konfigurasi interface fast eth0/0
DHCP-SERVER(config)#inter fa0/0
DHCP-SERVER(config-if)#ip add 192.168.50.1 255.255.255.0
DHCP-SERVER(config-if)#desc GATEWAY LAN
DHCP-SERVER(config-if)#no shut
DHCP-SERVER(config-if)#exit
DHCP-SERVER(config)#inter fa0/0
DHCP-SERVER(config-if)#ip add 192.168.50.1 255.255.255.0
DHCP-SERVER(config-if)#desc GATEWAY LAN
DHCP-SERVER(config-if)#no shut
DHCP-SERVER(config-if)#exit
Setting DHCP pool
DHCP-SERVER(config)#ip dhcp pool dhcplan
DHCP-SERVER(dhcp-config)#network 192.168.50.0 255.255.255.0
DHCP-SERVER(dhcp-config)#default-router 192.168.50.1
DHCP-SERVER(dhcp-config)#dns 8.8.8.8
DHCP-SERVER(dhcp-config)#exit
DHCP-SERVER(config)#ip dhcp pool dhcplan
DHCP-SERVER(dhcp-config)#network 192.168.50.0 255.255.255.0
DHCP-SERVER(dhcp-config)#default-router 192.168.50.1
DHCP-SERVER(dhcp-config)#dns 8.8.8.8
DHCP-SERVER(dhcp-config)#exit
Setting ip address yang tidak boleh diberikan client
DHCP-SERVER(config)#ip dhcp excluded-address 192.168.50.1
DHCP-SERVER(config)#ip dhcp excluded-address 192.168.50.30 192.168.50.50
DHCP-SERVER(config)#do wr
Building configuration...
[OK]
DHCP-SERVER(config)#ip dhcp excluded-address 192.168.50.1
DHCP-SERVER(config)#ip dhcp excluded-address 192.168.50.30 192.168.50.50
DHCP-SERVER(config)#do wr
Building configuration...
[OK]
3. Atur IP address di
setiap PC-client
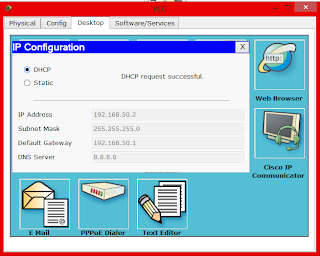
klik 2x icon pc-0 &
pc-1 & pc-2
klik desktop
klik ip configuration
dan pilih DHCP
Close windows
4. Tes
ini langkah terakhir
testing, simak ya langkah-langkahnya::
berikan icon surat dari
pc-0 & pc-1 atau yg lainnya terserah
klik simulation
semoga Bermanfaat :)